
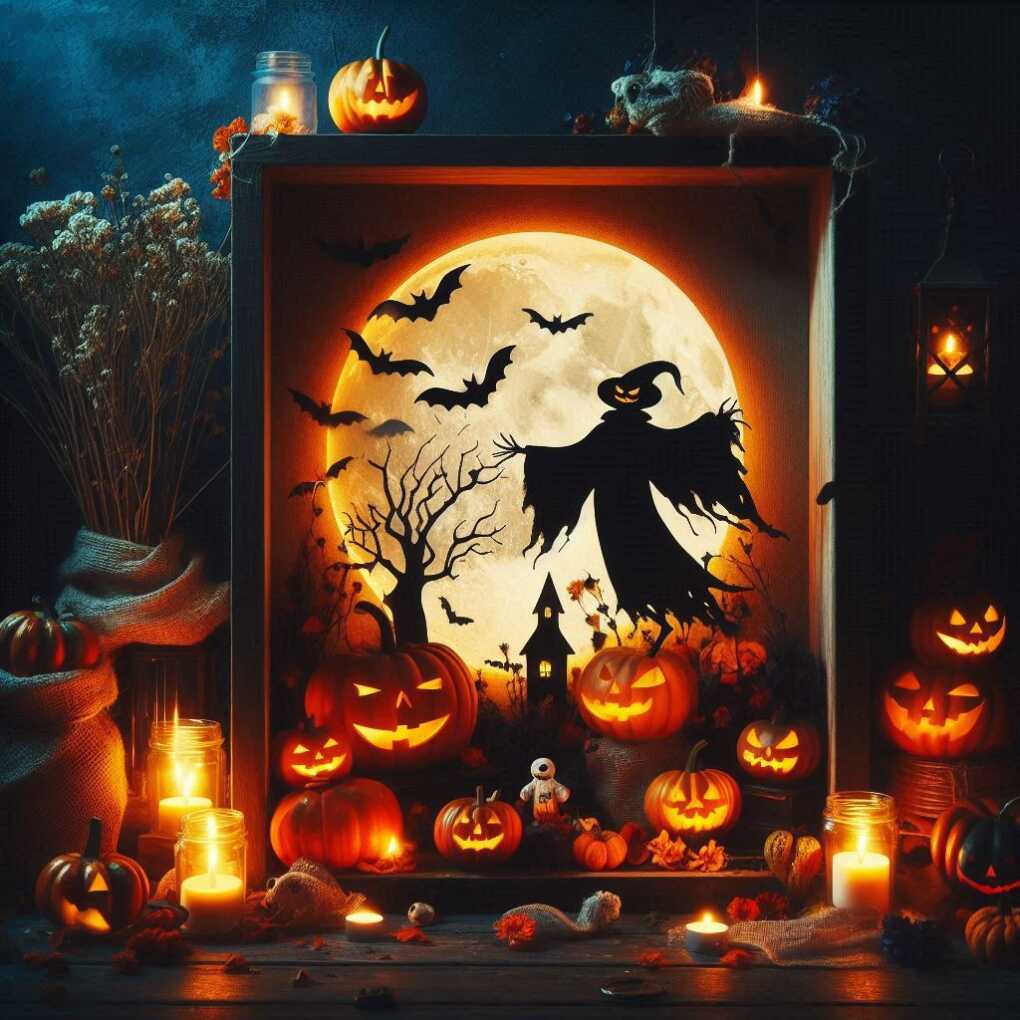
Halloween is just around the corner, and it’s time to transform your home into a haunted haven. Whether you’re hosting a party or simply want to embrace the spooky season, these 15 indoor Halloween decoration ideas will help you create a spine-chilling atmosphere that will impress your guests and trick-or-treaters alike. From eerie entryways to creepy kitchens, we’ve got you covered with a variety of DIY projects and store-bought options to suit every style and budget.

1. Ghostly Gauze Drapes
Transform your windows and doorways into ethereal portals with ghostly gauze drapes. This simple yet effective decoration creates an instant haunted house vibe. Drape white cheesecloth or gauze fabric over your curtain rods, allowing it to billow and flow. Add battery-operated LED lights behind the fabric for an otherworldly glow that will send shivers down your guests’ spines.
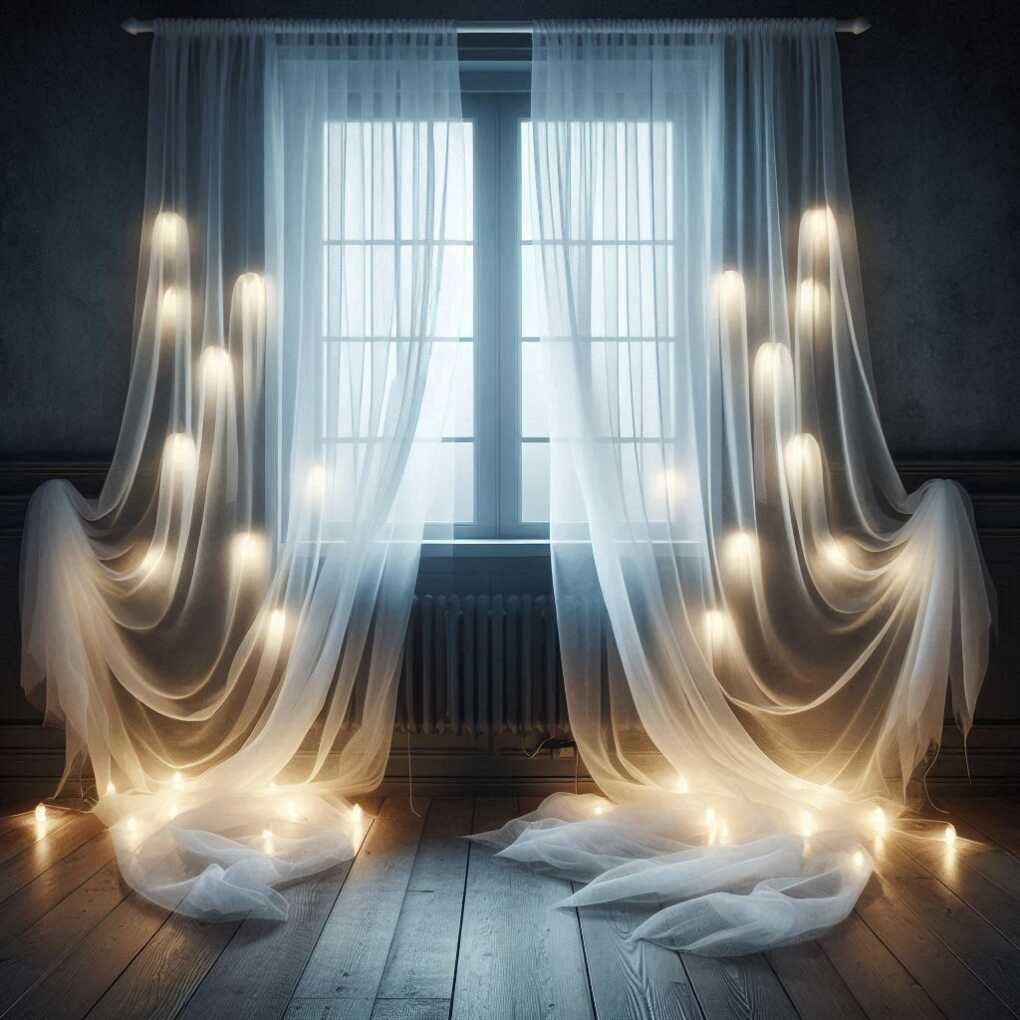
For a more dramatic effect, consider layering different shades of gauze, such as white and light grey. You can also add silhouettes of ghosts or other spooky figures cut from black cardstock between the layers for an extra eerie touch.
| Materials Needed | Estimated Cost | Difficulty Level |
|---|---|---|
| White cheesecloth or gauze fabric | $10-$20 | Easy |
| Battery-operated LED lights | $5-$15 | Easy |
| Curtain rods (if not already installed) | $15-$30 | Moderate |
| Optional: Grey gauze fabric | $10-$20 | Easy |
| Optional: Black cardstock for silhouettes | $5 | Easy |
Pro Tip: To create a more authentic aged look, tea-stain your white gauze fabric before hanging. Soak the fabric in strong black tea for a few hours, then hang it to dry for a naturally weathered appearance.
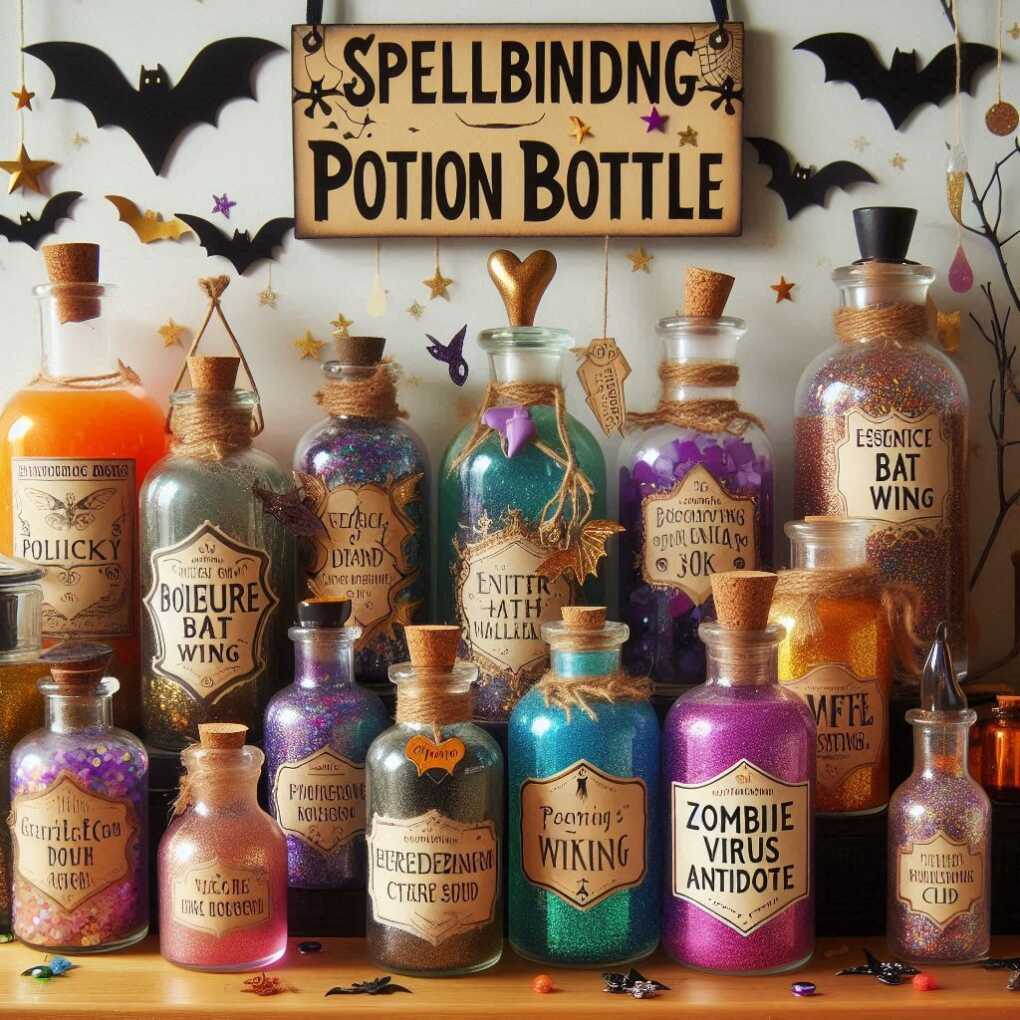
2. Spellbinding Potion Bottles
Create a witch’s brew station with an array of mysterious potion bottles. Collect various glass bottles and jars, then fill them with coloured water, glitter, and small Halloween-themed trinkets. Use your imagination to craft clever labels like “Essence of Bat Wing” or “Zombie Virus Antidote.” Arrange these magical concoctions on a shelf or sideboard for an enchanting display.
To elevate your potion bottle collection, consider adding these elements:
- Glowing Potions: Use tonic water and a blacklight to create eerily glowing potions.
- Floating Specimens: Suspend small plastic insects or eyeballs in clear hand sanitiser for a preserved specimen effect.
- Bubbling Brews: Create a bubbling effect by adding Alka-Seltzer tablets to coloured water just before guests arrive.
- Materials needed:
- Assorted glass bottles and jars
- Food coloring
- Glitter
- Small Halloween trinkets (plastic spiders, eyeballs, etc.)
- Adhesive labels
- Creativity for naming potions
- Optional: Tonic water and blacklight
- Optional: Clear hand sanitiser
- Optional: Alka-Seltzer tablets
Commercial Product Spotlight:
For those short on time, consider the Prextex Halloween Potion Bottles set. It includes 9 pre-made potion bottles with spooky labels and cork stoppers, perfect for an instant witch’s brew display.
Pro Tip: Use a hot glue gun to attach small plastic creatures or bones to the outside of your bottles for an extra creepy touch. You can also wrap twine or jute around the bottlenecks for a more rustic, aged appearance.
3. Creepy Candlelit Corners
Nothing sets a spooky mood quite like flickering candlelight. Create eerie vignettes throughout your home using an assortment of candles in various sizes and styles. Opt for black, orange, or deep red candles for a Halloween-appropriate colour scheme. For safety, consider using flameless LED candles, especially if you have children or pets.
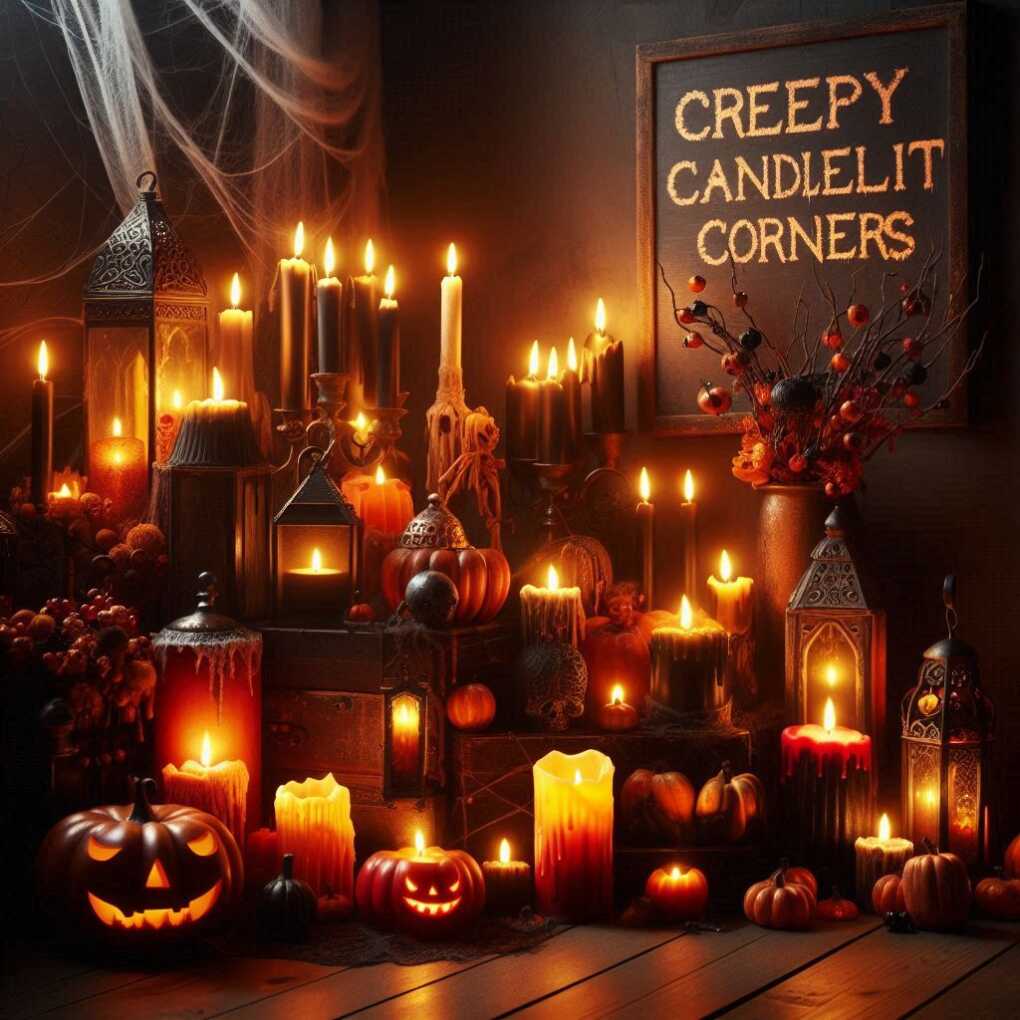
Enhance your candlelit corners with these ideas:
- Dripping Blood Candles: Use red wax or paint to create a dripping blood effect on white pillar candles.
- Skull Candle Holders: Place LED tealights inside small decorative skulls for a macabre glow.
- Floating Candles: Create the illusion of floating candles using clear fishing lines and battery-operated tealights.
“There is something haunting in the light of the moon; it has all the dispassionateness of a disembodied soul, and something of its inconceivable mystery.” – Joseph Conrad
Commercial Product Recommendation:
The Flameless Candles with Remote and Timer set offers a safe and convenient way to create a spooky ambience. With 9 pillar candles of varying heights and a remote control, you can easily set the mood without worrying about open flames.
Pro Tip: Create shadow puppets by cutting spooky shapes out of black cardstock and attaching them to wooden skewers. Place these between your candles and walls to cast eerie shadows around the room.
4. Haunted Portrait Gallery
Transform your family photos or artwork into a gallery of ghostly ancestors. Print out vintage portraits or use existing framed pictures, and add spooky elements using photo editing software or by physically altering the images. Distort faces, add eerie glowing eyes, or incorporate supernatural elements to create a chilling collection of haunted portraits.
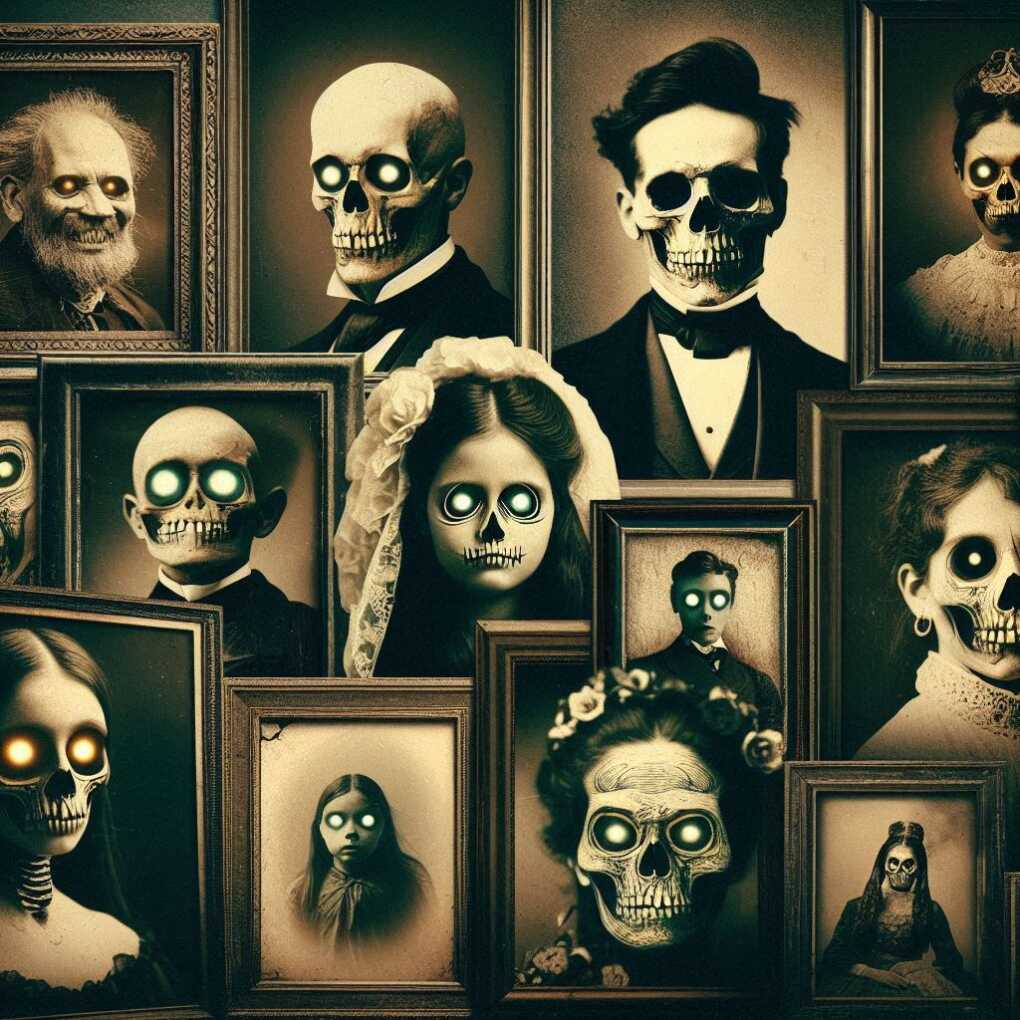
To make your haunted portrait gallery even more impressive:
- Interactive Portraits: Use a tablet or digital photo frame behind a traditional frame to display a still image that occasionally “comes to life” with subtle movements or changes.
- 3D Effect: Create a lenticular print effect by printing two versions of an image (normal and spooky) and using a ribbed plastic sheet to create a changing image when viewed from different angles.
- Hidden Messages: Write hidden messages or warnings using invisible UV ink, which can only be seen when illuminated with a black light.
DIY Portrait Aging Technique:
- Print your chosen portraits in sepia or black and white.
- Carefully burn the edges of the prints for an aged look.
- Dab coffee grounds around the edges and gently across the surface for stains and discolouration.
- Once dry, place in an antique or distressed frame.
Pro Tip: For an extra creepy effect, install small, battery-operated LED lights behind the eyes of your portraits. Use a small knife or box cutter to carefully cut out the eyes, then place red or yellow LEDs behind them for a haunting glow.
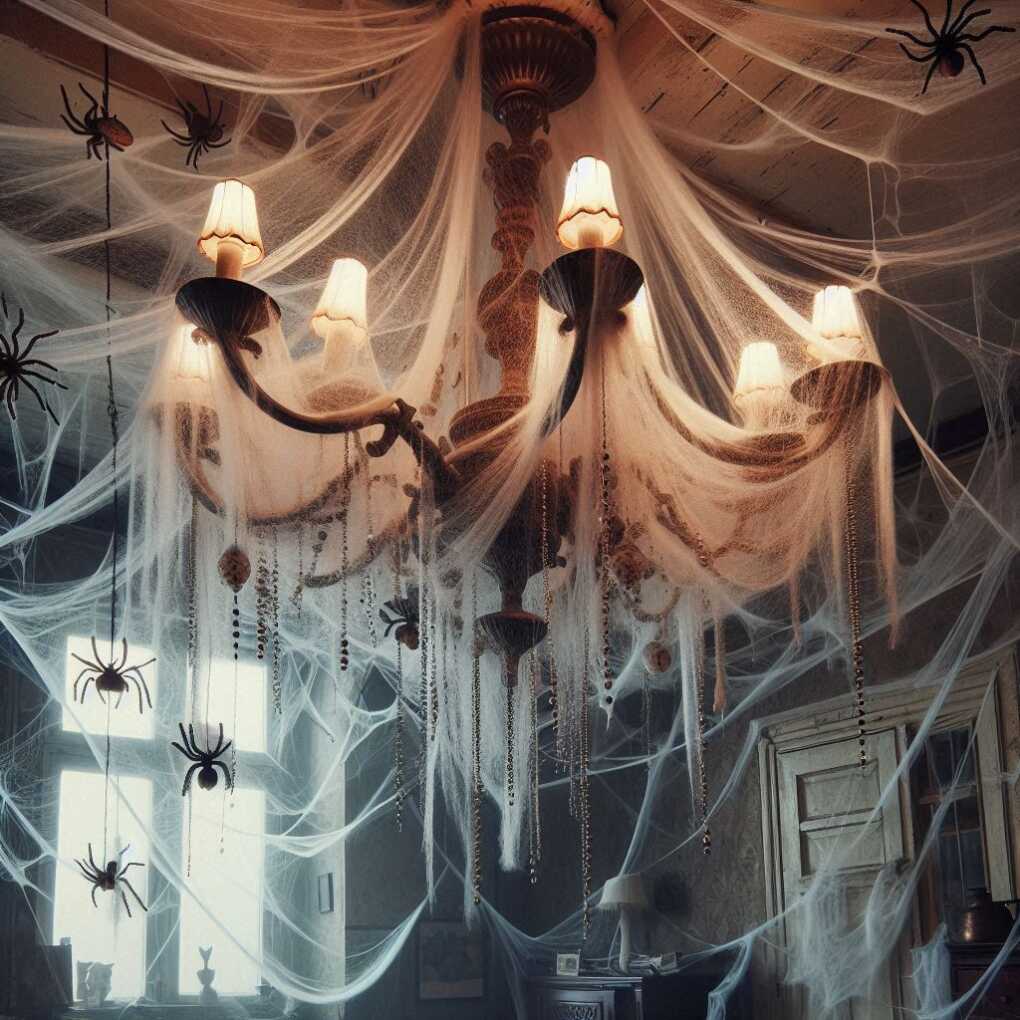
5. Cobweb-Covered Chandeliers
Give your lighting fixtures a creepy makeover with faux cobwebs. Drape stretchy spider web material over chandeliers, lamps, and ceiling fans to create an abandoned, haunted house atmosphere. Add plastic spiders for an extra touch of realism. This simple decoration can dramatically change the ambience of any room.
To take your cobweb decorations to the next level:
- Glowing Webs: Spray your cobwebs with glow-in-the-dark paint for an eerie nighttime effect.
- Giant Spiders: Create oversized spiders using black trash bags stuffed with newspaper and pipe cleaners for legs.
- Cocoon Victims: Wrap small mannequins or dolls in stretchy cobweb material to create the illusion of spider victims.
| Item | Quantity | Estimated Cost |
|---|---|---|
| Stretchy spider web material | 2-3 bags | $5-$10 |
| Plastic spiders | 1 pack (20-30 spiders) | $3-$5 |
| Optional: Glow-in-the-dark spray paint | 1 can | $8-$12 |
| Optional: Black trash bags | 1 box | $5-$8 |
| Optional: Pipe cleaners | 1 pack | $2-$4 |
Commercial Product Spotlight:
For a quick and easy cobweb solution, try the Kangaroo’s Stretchy Spider Web. This 400 square-foot web comes with 25 plastic spiders and is easy to stretch and shape around your fixtures.
Pro Tip: To create more realistic-looking cobwebs, gently pull and stretch the material in different directions as you apply it. This creates a more organic, haphazard appearance that mimics real spider webs.
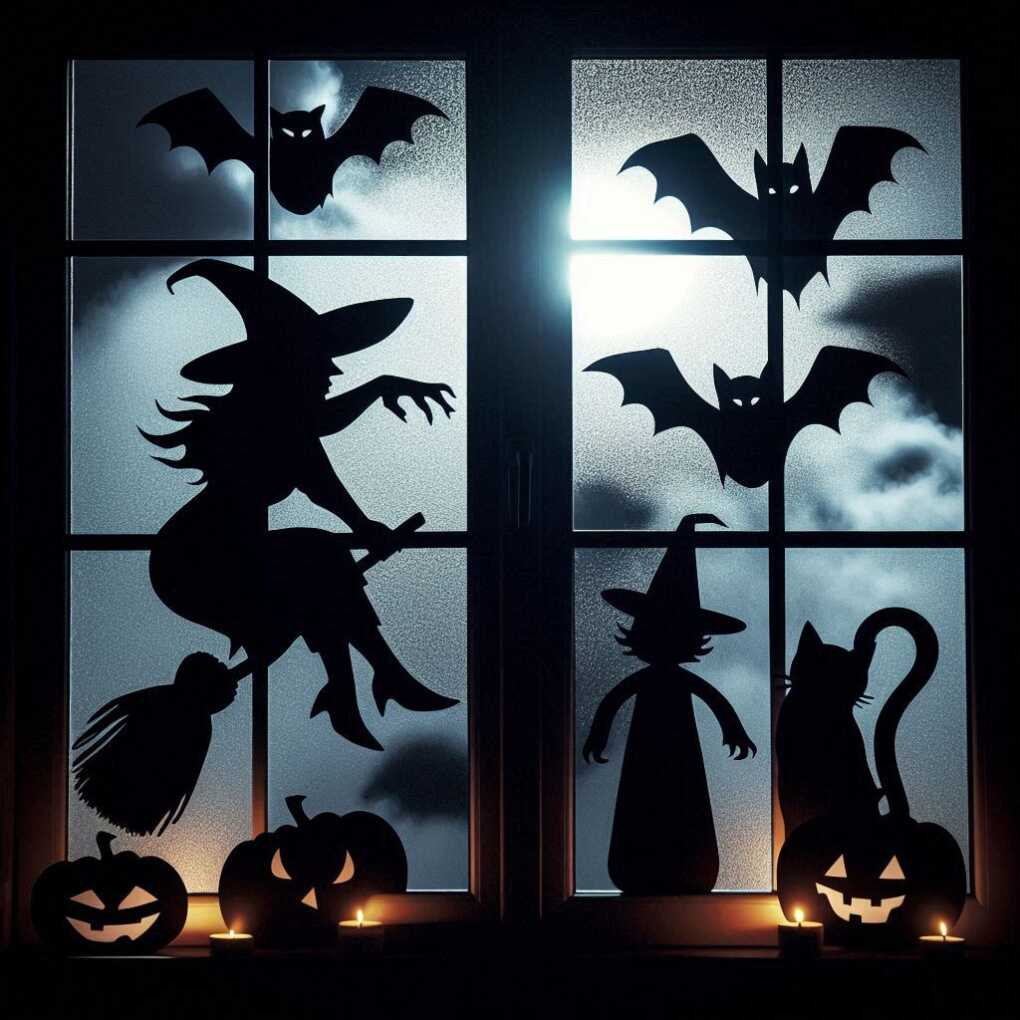
6. Sinister Silhouettes
Create ominous shadows with spooky silhouettes. Cut out shapes of witches, bats, cats, or other Halloween icons from black cardstock or construction paper. Tape these silhouettes to your windows, and when backlit, they’ll cast eerie shadows both inside and outside your home. This is a budget-friendly decoration that makes a big impact.
Expand your silhouette game with these ideas:
- Moving Silhouettes: Attach some silhouettes to small motors or rotating platforms to create subtle movements.
- Layered Scenes: Create depth by using multiple layers of silhouettes at different distances from the light source.
- Color-Changing Backlights: Use colour-changing LED lights behind your silhouettes for a dynamic effect.
DIY Silhouette Template Sources:
- Free Printable Halloween Silhouettes
- Martha Stewart’s Halloween Clip-Art and Templates
Pro Tip: For a more polished look, use a craft knife or precision cutting machine like a Cricut to create intricate silhouette designs. This allows for more detailed and complex shapes that can really elevate your window displays.
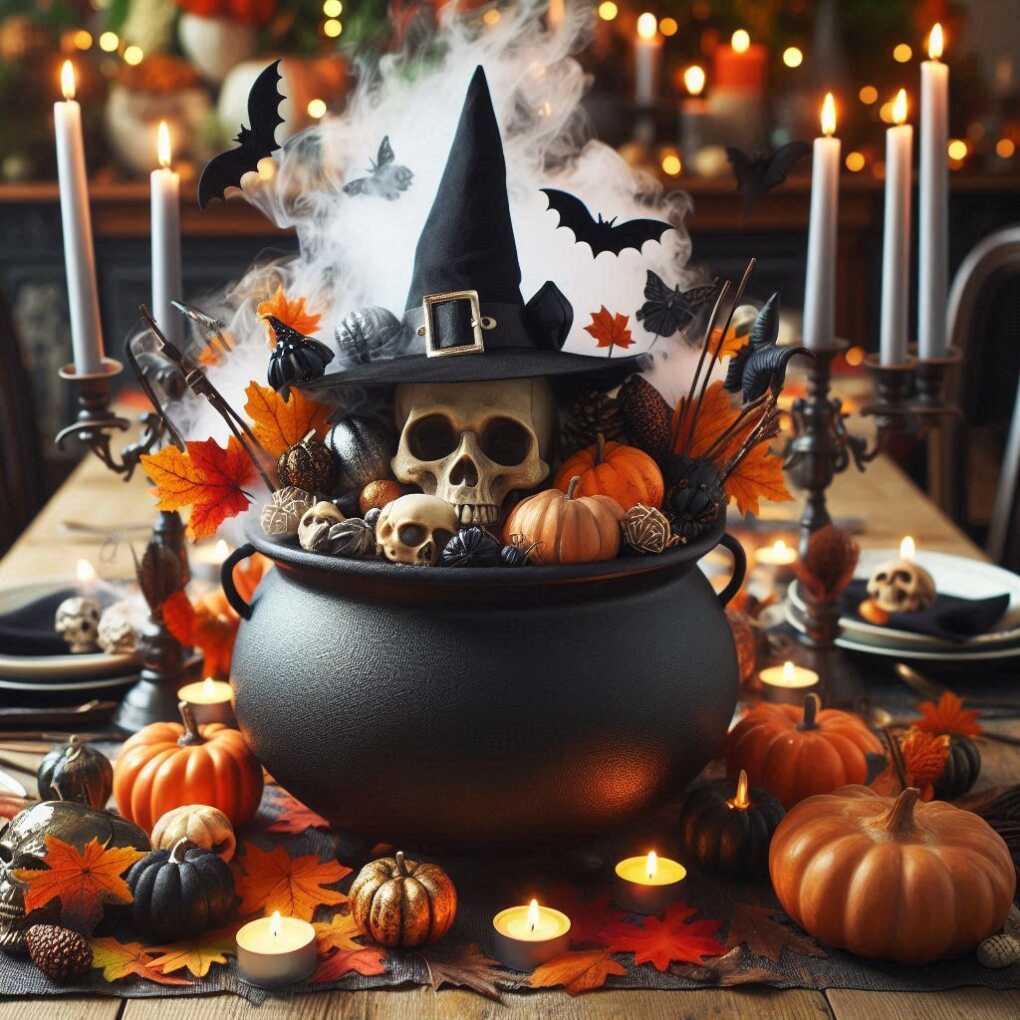
7. Witch’s Cauldron Centerpiece
Craft a bewitching centrepiece for your dining table or coffee table using a large black cauldron. Fill it with an array of Halloween-themed items such as plastic skulls, faux autumn leaves, mini pumpkins, and battery-operated flickering candles. For an extra touch of magic, add dry ice to create a smoking effect (adult supervision is required).
Enhance your witch’s cauldron with these creative additions:
- Potion Ingredients: Include labelled jars of “magical” ingredients like “Eye of Newt” (peppercorns) or “Dragon Scales” (sequins).
- Spell Book: Place an old, weathered book next to the cauldron with a fake wand as if the witch stepped away mid-spell.
- Animated Stirring: Use a small motor and a wooden spoon to create an auto-stirring effect in your cauldron.
- Cauldron contents ideas:
- Plastic skulls and bones
- Artificial autumn leaves
- Mini pumpkins and gourds
- LED flickering candles
- Halloween-themed figurines
- Dry ice (optional, for special effects)
- Labeled jars of “magical” ingredients
- Fake spell book and wand
- Small motor for stirring effect (optional)
Commercial Product Recommendation:
The Lighted Black Cauldron with Floating Skulls offers a ready-made centrepiece solution. It features a misting effect, colour-changing lights, and floating skull decorations for an instant spooky focal point.
Pro Tip: To create a safe, long-lasting fog effect without dry ice, use a small ultrasonic mist maker in your cauldron. These devices are often used in fountains and can create a continuous mist when submerged in water.
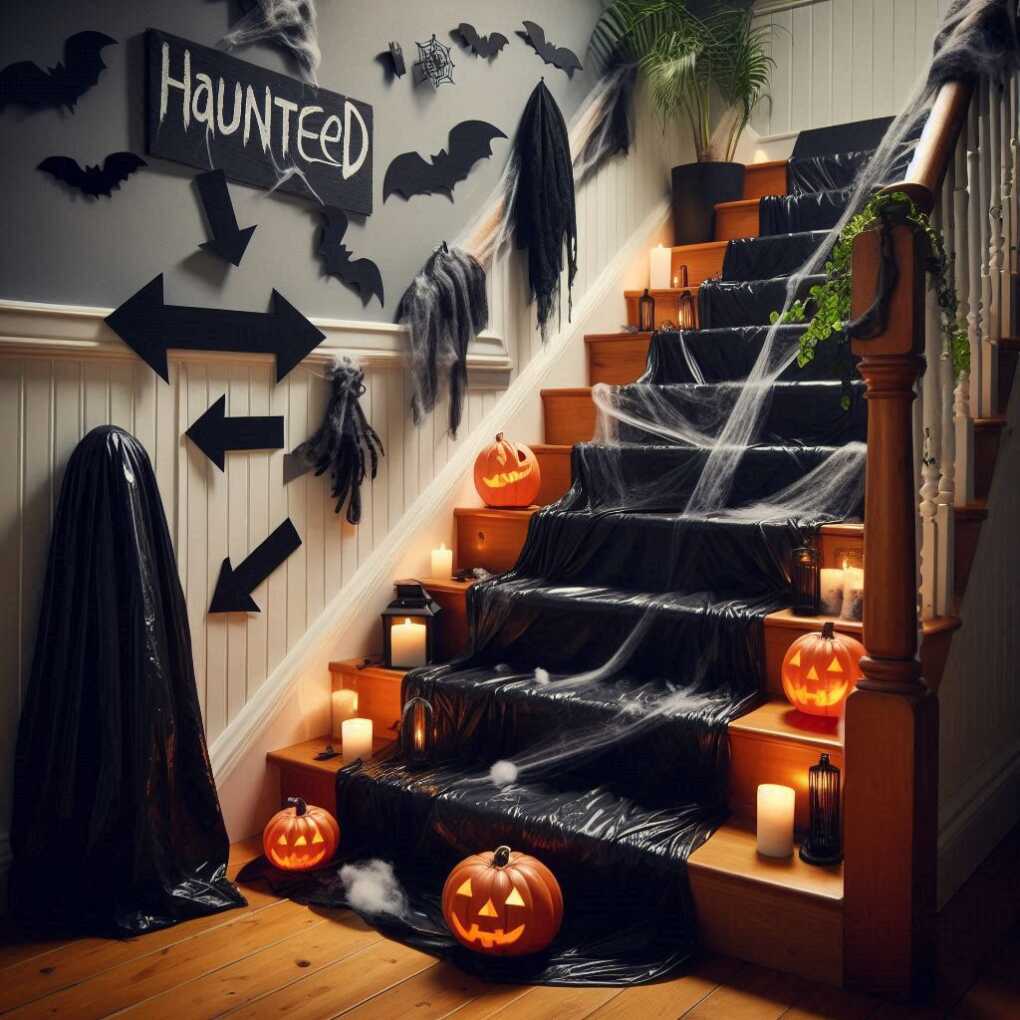
8. Spooky Staircase Makeover
Transform your staircase into a creepy climb with strategically placed decorations. Drape black fabric or garbage bags along the banister, then add battery-operated candles, plastic pumpkins, and eerie signs pointing to different “haunted” areas of your home. Don’t forget to incorporate some cobwebs and spiders for that authentic abandoned look.
Take your staircase decoration to the next level with these ideas:
- Floating Candles: Create a magical floating candle effect using battery-operated candles and a fishing line.
- Creepy Portraits: Line the staircase wall with spooky portraits that seem to follow visitors with their eyes.
- Glowing Footprints: Use glow-in-the-dark paint to create mysterious footprints leading up the stairs.
DIY Spooky Stair Signs:
Create signs with clever names for different “haunted” areas of your home, such as:
- “Dungeon of Doom” (Basement)
- “Witch’s Kitchen” (Kitchen)
- “Ghostly Gallery” (Hallway)
- “Madame Zara’s Fortune Telling Room” (Bedroom)
Pro Tip: To create an extra eerie atmosphere, install a small Bluetooth speaker hidden in the stairwell playing soft, spooky sound effects like creaking floorboards, distant whispers, or a slowly ticking clock.
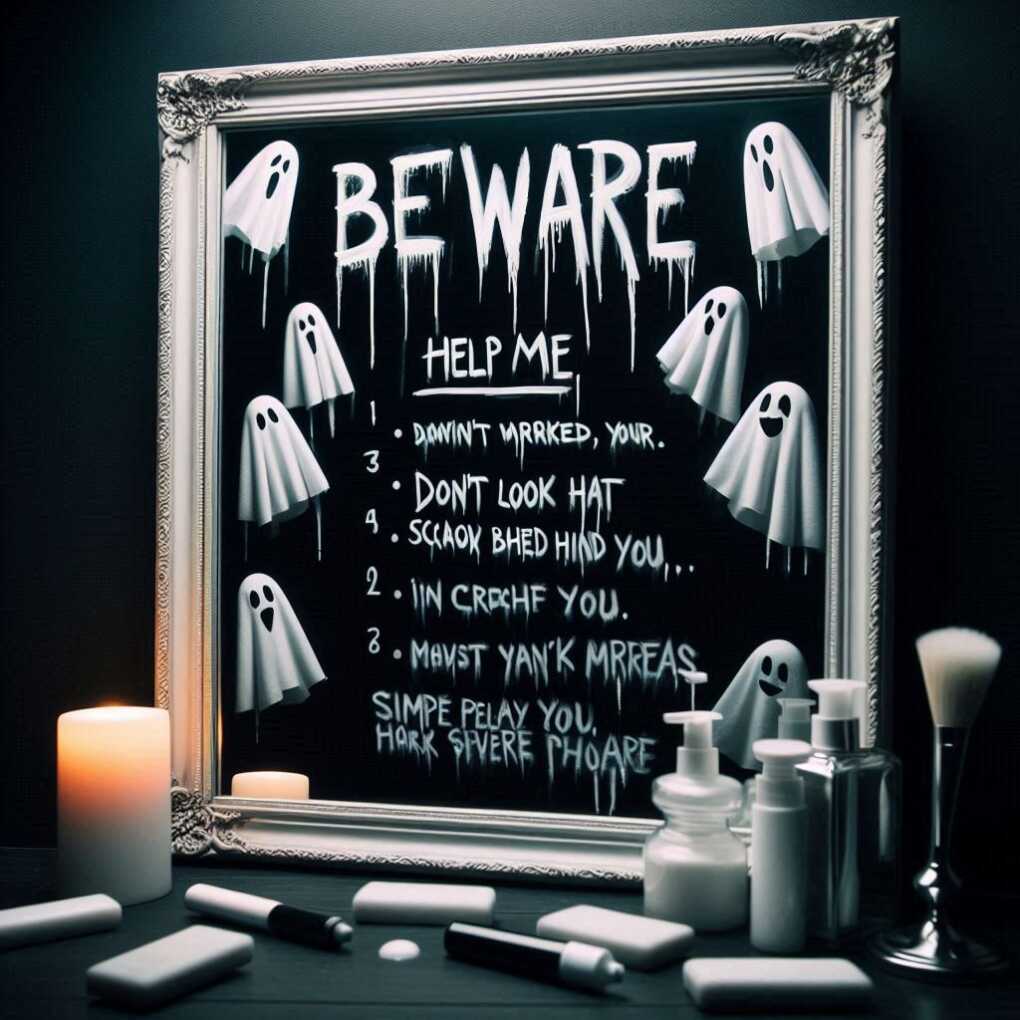
9. Ghostly Mirror Messages
Create an interactive and spooky element by writing cryptic messages on your mirrors using washable window markers or soap. Phrases like “Beware,” “Help me,” or “Don’t look behind you” will give your guests a fright when they catch their reflection. For an extra scare, set up a simple pulley system to make objects “float” in the mirror’s reflection.
Enhance your ghostly mirror messages with these ideas:
- Bloody Handprints: Create realistic-looking bloody handprints using washable red paint or specialty Halloween blood gel.
- Phantom Writing: Use a mixture of water and cornstarch to write invisible messages that only appear when the mirror fogs up.
- Digital Illusions: Set up a tablet behind a two-way mirror to display ghostly apparitions or sudden scary images.
“Monsters are real, and ghosts are real too. They live inside us, and sometimes, they win.” – Stephen King
Commercial Product Spotlight:
For a high-tech scare, consider the AtmosFX Digital Decorating Kit. This kit allows you to project ghostly apparitions onto windows, walls, or even sheer fabrics for a truly immersive haunted house experience.
Pro Tip: To create a subtle, creepy effect, slightly tilt your mirrors downward. This distorts reflections in an unsettling way and can make your guests feel uneasy without knowing exactly why.
10. Creepy Curiosity Cabinet
Set up a display of odd and unsettling objects to create a curiosity cabinet worthy of any mad scientist or occult practitioner. Use a bookshelf or display case to arrange items such as fake specimens in jars, old books with spooky titles, antique medical instruments, and mysterious artifacts. This display will spark conversation and intrigue among your guests.

Enhance your curiosity cabinet with these unique items:
- Shrunken Heads: Create miniature shrunken heads using small apples, carving tools, and shoe polish.
- Cursed Objects: Label ordinary items as cursed or haunted with elaborate backstories.
- Faux Taxidermy: Incorporate whimsical taxidermy-style art pieces, like a mounted jackalope or a “fairy specimen.”
DIY Specimen Jars:
- Fill clean jars with water tinted with food colouring.
- Add small plastic toys or figurines to create “specimens.”
- Seal the jars and create aged labels with mysterious names and dates.
Commercial Product Recommendation:
The Wizarding World Harry Potter Mystery Cubes set provides instant curiosities with a magical twist, perfect for adding to your cabinet of oddities.
Pro Tip: Use a low-wattage bulb or amber-coloured LED light to illuminate your curiosity cabinet. This creates a warm, aged glow that enhances the mysterious atmosphere of your display.
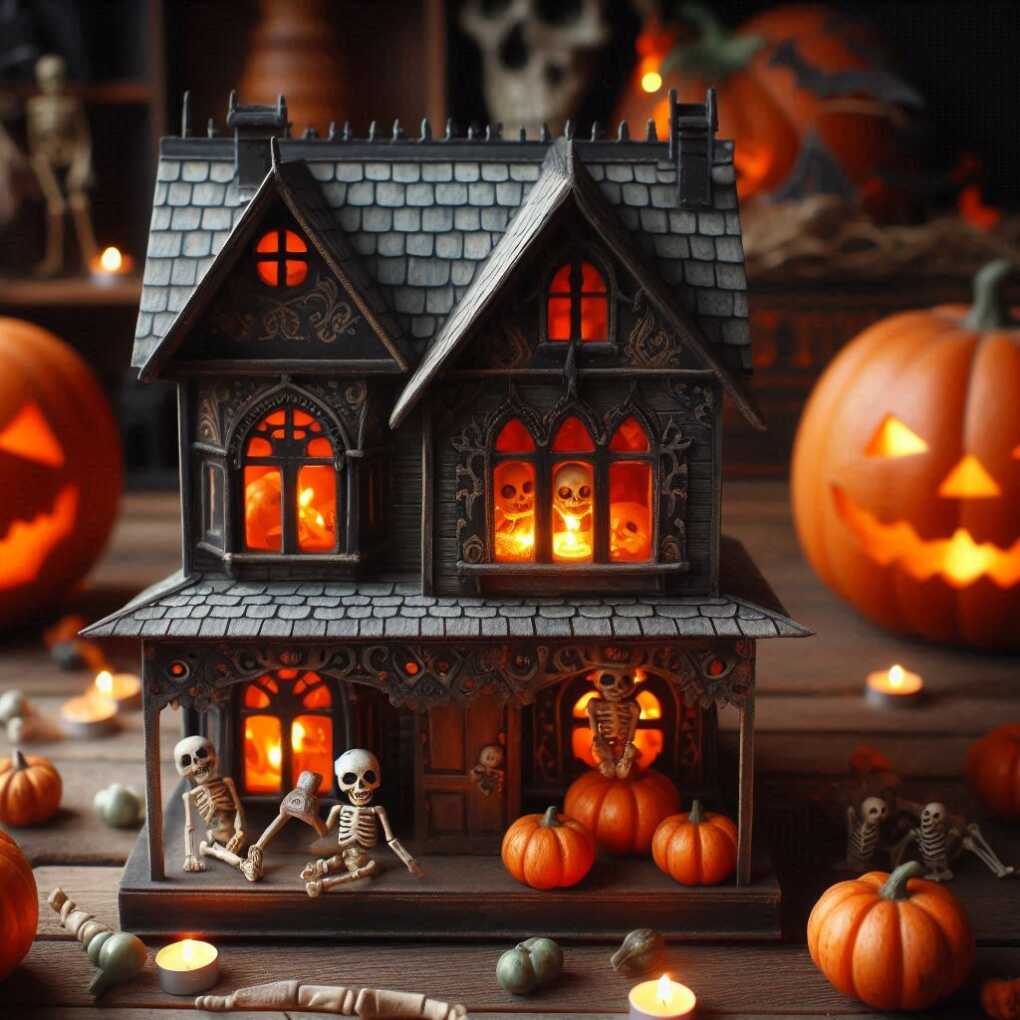
11. Haunted Dollhouse
Repurpose an old dollhouse or create a miniature haunted house from cardboard to add a unique decorative element to your Halloween decor. Paint it in dark colours, add tiny spooky details like miniature pumpkins and skeletons, and use LED tea lights to create an eerie glow from within. This charming yet creepy creation will be a focal point of your Halloween display.
To make your haunted dollhouse even more captivating:
- Miniature Haunted Rooms: Create different themed rooms, such as a tiny witch’s kitchen, a minuscule mad scientist’s lab, or a diminutive séance parlour.
- Working Lights: Install small LED lights with thin wires to create working lamps and chandeliers.
- Spooky Sounds: Hide a small Bluetooth speaker inside to play eerie sound effects.
- Moving Elements: Use small motors or magnets to create subtle movements, like a rocking chair that moves on its own or a swinging chandelier.
| Miniature Item | Where to Find | Estimated Cost |
|---|---|---|
| Tiny pumpkins | Craft stores | $2-$5 |
| Miniature skeletons | Dollar stores | $1-$3 |
| LED tea lights | Online retailers | $5-$10 for a pack |
| Dollhouse furniture | Thrift stores or online | Varies |
| Small LED string lights | Craft stores | $8-$15 |
| Miniature crafting materials | Hobby shops | $10-$20 |
Commercial Product Spotlight:
For those who prefer a ready-made option, the Department 56 Halloween Village series offers a variety of spooky miniature buildings and accessories that can be combined to create an entire haunted town.
Pro Tip: Use a mixture of sand, paint, and glue to create realistic-looking miniature stonework for your haunted dollhouse’s exterior. Apply the mixture with a small brush, then scratch in brick or stone patterns before it dries completely.
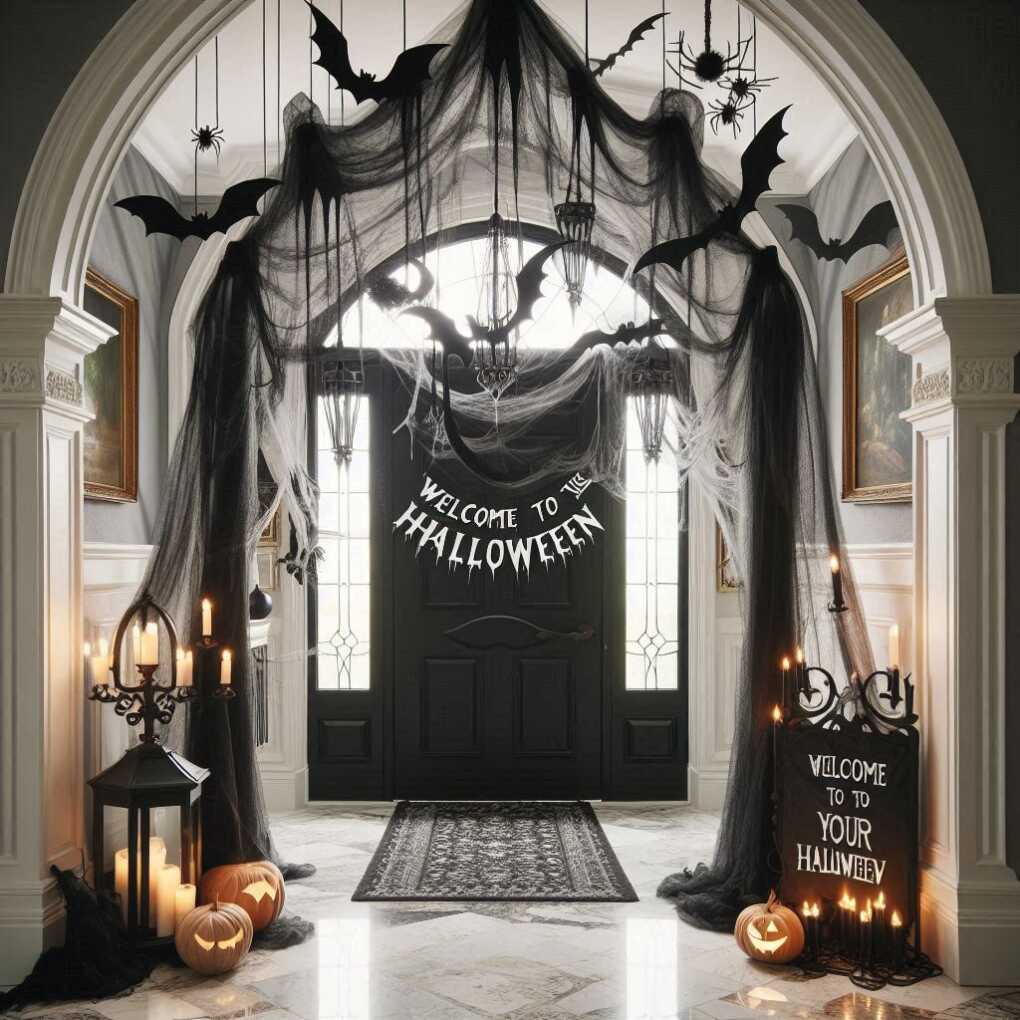
12. Eerie Entryway Arch
Welcome guests with a spine-chilling entrance by creating a spooky arch over your front door or a prominent doorway inside your home. Use black crepe paper or fabric to cover the arch, then decorate it with hanging bats, spiders, and perhaps a menacing sign welcoming visitors to your haunted abode. This sets the tone for the Halloween experience from the moment people enter your space.
Enhance your eerie entryway arch with these ideas:
- Animated Elements: Add battery-operated animated props like hanging bats with flapping wings or dropping spiders.
- Fog Curtain: Create a curtain of fog using a fog machine and a PVC pipe with small holes drilled along its length.
- Glowing Eyes: Cut eye shapes from toilet paper rolls, insert glow sticks, and hide them in the foliage or decorations around your arch.
DIY Spooky Arch Sign Ideas:
- “Abandon All Hope, Ye Who Enter Here”
- “Beware: The Spirits Are Restless Tonight”
- “Welcome to Our Haunted Home”
- “Enter at Your Own Risk”
Commercial Product Recommendation:
The 9 Foot Halloween Archway from Spirit Halloween offers a quick setup solution with built-in LED lights and spooky design elements.
Pro Tip: To create a more immersive experience, use a smart doorbell or motion sensor connected to a small speaker to trigger spooky sounds or a recorded greeting when guests approach your eerie entryway arch.
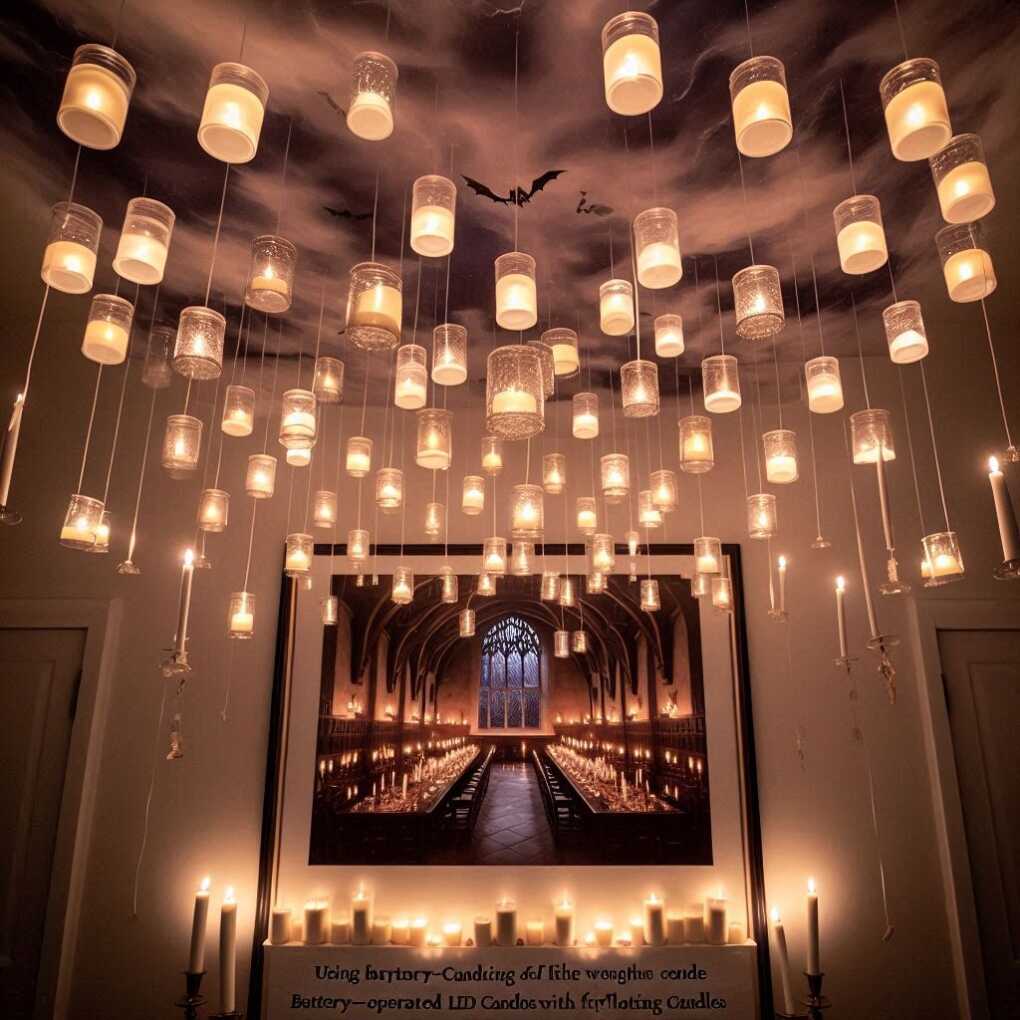
13. Frightful Floating Candles
Recreate the enchanted ceiling of Hogwarts’ Great Hall with floating candles. Using battery-operated LED candles and fishing lines, suspend candles at various heights from your ceiling. This magical illusion works particularly well in entryways or over dining tables. The soft, flickering light will create an otherworldly ambience that’s both spooky and enchanting.
To elevate your floating candle display:
- Varied Candle Sizes: Use a mix of different-sized LED candles for a more dynamic and realistic look.
- Faux Wax Drips: Add hot glue “drips” to your LED candles and paint them white for a more authentic appearance.
- Starry Night Effect: Intersperse your floating candles with small LED string lights to create a twinkling star effect.
- Materials needed:
- Battery-operated LED candles (various sizes)
- Clear fishing line
- Ceiling hooks or strong adhesive hooks
- Scissors
- Step ladder for installation
- Optional: Hot glue gun and glue sticks
- Optional: White paint
- Optional: LED string lights
Commercial Product Spotlight:
For a quick and easy setup, consider the Homemory Floating Candle Set, which includes 12 LED candles with attached fishing line, ready to hang.
Pro Tip: To create the illusion of candles floating in midair during the day, paint the fishing line the same colour as your ceiling before hanging the candles. This will make the lines nearly invisible, enhancing the magical effect.
14. Sinister Shadow Box Displays
Create intriguing shadow box displays to add depth and interest to your Halloween decor. Use small wooden boxes or deep picture frames to craft miniature spooky scenes. Fill them with tiny skeletons, gravestone miniatures, and other small Halloween props. Arrange these shadow boxes on shelves or mount them on walls for a gallery of gruesome delights.
Enhance your shadow box displays with these creative ideas:
- Layered Scenes: Use multiple layers of cardboard or foam board to create depth in your scenes.
- Backlighting: Install small LED lights in the back of the shadow box for dramatic lighting effects.
- Interactive Elements: Create shadow boxes with movable parts, like a coffin lid that opens to reveal a vampire inside.
DIY Shadow Box Themes:
- Miniature graveyard with tombstones and a spooky tree
- Witch’s spell ingredients with tiny potion bottles and a cauldron
- Haunted library with miniature books and ghostly apparitions
- Mad scientist’s laboratory with test tubes and a “monster” silhouette
Pro Tip: Use a mix of 2D and 3D elements in your shadow boxes for added visual interest. For example, combine flat paper cutouts with small 3D objects to create a more dynamic scene.
15. Creepy Cloth Draping
For a quick and effective way to transform any room, use creepy cloth – a tattered, gauze-like fabric available at most Halloween stores. Drape it over furniture, doorways, and along walls to instantly create a decrepit, abandoned atmosphere. Layer different colours like black, grey, and off-white for added depth and texture.
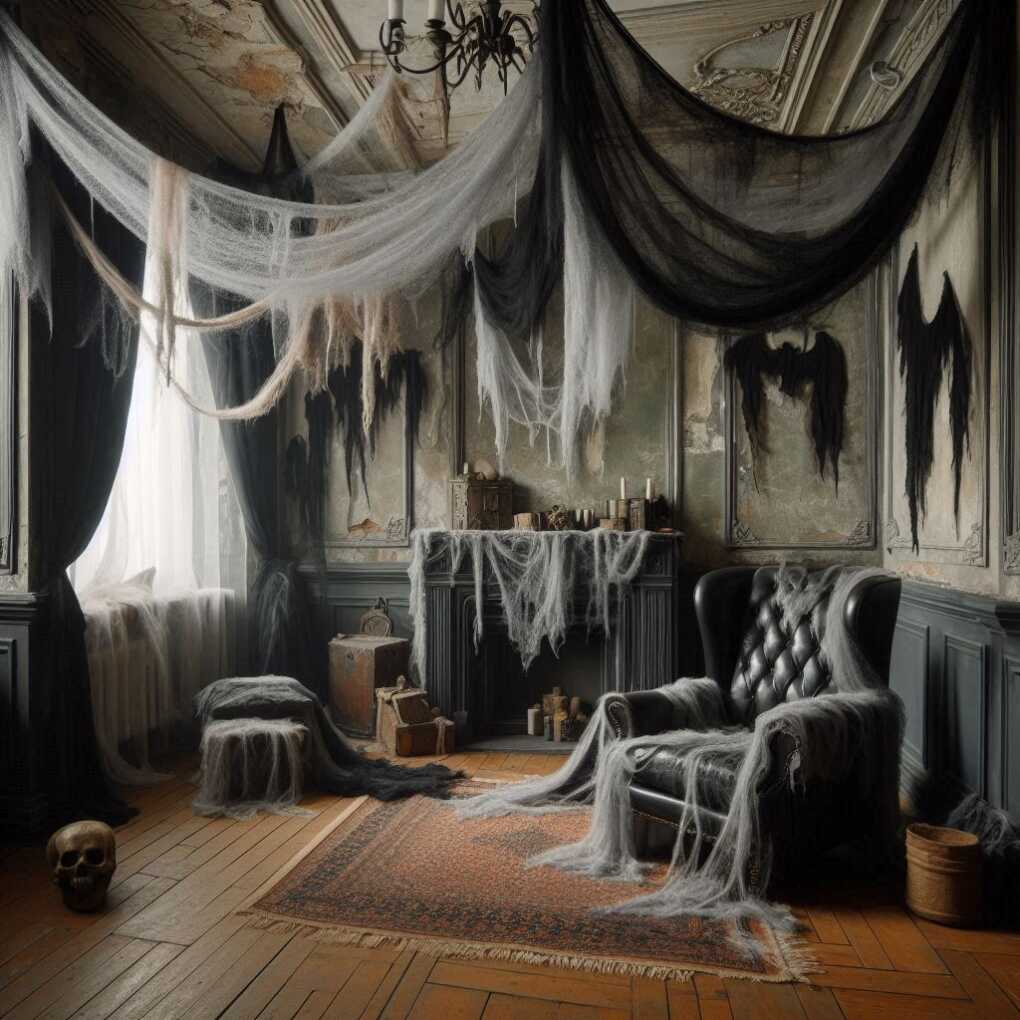
To maximize the impact of your creepy cloth decorations:
- Strategic Lighting: Use uplighting behind the draped creepy cloth to cast eerie shadows.
- Hidden Surprises: Conceal small Halloween props within the folds of the cloth for unexpected scares.
- Outdoors Application: Use creepy cloth on outdoor structures like trees or porch railings for a cohesive look from inside to outside.
DIY Creepy Cloth Recipe:
- Soak white cheesecloth in a mixture of water and coffee or tea.
- Hang to dry, then tear and distress the fabric for an aged look.
- Optionally, lightly spray with diluted grey or brown paint for extra depth.
“Where there is no imagination, there is no horror.” – Arthur Conan Doyle
Commercial Product Recommendation:
The Kangaroo’s Freaky Fabric offers 60 square feet of creepy cloth, perfect for covering large areas quickly and easily.
Pro Tip: To create the illusion of cobwebs, gently pull apart sections of the creepy cloth and stretch them between furniture pieces or across corners. This adds an extra layer of spookiness to your decor.
Conclusion
In conclusion, these 15 indoor Halloween decoration ideas offer a mix of DIY projects and simple store-bought solutions to create a hauntingly beautiful atmosphere in your home. From subtle touches like spooky silhouettes to more elaborate setups like a witch’s cauldron centrepiece, there’s something for every taste and skill level. Remember, the key to successful Halloween decor is layering – combine several of these ideas to create a truly immersive experience that will delight and frighten your guests in equal measure.